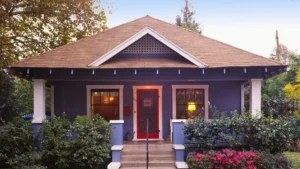


Apartment painting is one of the most effective ways to refresh and personalize your living space. Whether you’re looking to change the mood of a room, cover up outdated colors, or add a fresh touch to a rental, painting can make a significant difference. In this article, we will discuss the benefits of apartment painting, offer tips on how to do it yourself, and share some ideas for choosing the best colors to match your style and space.
Why Apartment Painting Is Important
Apartment painting isn’t just about changing the color of your walls; it’s about transforming the entire feel of a space. It allows you to create a home that reflects your personality and tastes. A fresh coat of paint can make a room feel larger, brighter, and more inviting. Whether you’re in a small studio or a larger two-bedroom apartment, the right colors and techniques can bring out the best features of your space.
For renters, apartment painting can be a great way to make your living space feel more like home. In some cases, landlords may even approve of painting as long as you follow specific guidelines. It’s a cost-effective way to update your apartment without committing to permanent changes. Plus, painting is one of the quickest home improvements that yields significant results.
Choosing the Right Paint for Your Apartment
When it comes to apartment painting, choosing the right type of paint is crucial. Not all paints are created equal, and the type of paint you select will depend on the surfaces you are working with and the overall effect you want to achieve.
Types of Paint Finishes
- Matte/Flat Finish: A matte or flat finish provides a smooth, non-reflective surface that works well in rooms with imperfections. It’s ideal for areas where you want a subtle, sophisticated look, such as bedrooms or living rooms.
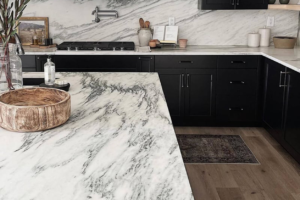
- Eggshell Finish: Slightly more reflective than matte, eggshell is a popular choice for apartments. It’s durable, easy to clean, and works well in high-traffic areas like kitchens and hallways.
- Satin Finish: Satin finishes have a soft sheen and are highly durable, making them suitable for bathrooms and kitchens. They resist moisture and stains better than matte finishes.
- Semi-Gloss and Gloss Finish: These finishes are the most reflective and work well on trim, doors, and cabinets. They are easy to clean but may highlight surface imperfections, so they should be applied to well-prepared surfaces.
Choosing the Color
Color is an essential part of apartment painting. The right color can create the atmosphere you desire, whether you want a calming retreat or a vibrant, energizing space. Here are some popular color options to consider:
- Neutral Tones: Shades of white, beige, and gray are timeless and versatile. They make rooms feel open and airy and provide a blank canvas for other decorative elements, such as furniture and artwork.
- Bold Colors: If you want to make a statement, consider using bold colors like deep blues, greens, or reds. These colors can create a sense of drama or warmth, depending on the tone.
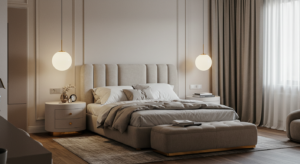
- Pastels: Soft pastels like blush pink, light blue, and mint green are perfect for creating a calm and serene environment. These colors work well in bedrooms and bathrooms.
- Accent Walls: If you’re hesitant to paint an entire room with a bold color, consider creating an accent wall. This technique involves painting one wall in a contrasting color to add depth and interest to the room.
Preparing Your Apartment for Painting
Proper preparation is key to a successful apartment painting project. Before you start, make sure you have the right tools and materials. Here’s a checklist to help you get ready:
- Paint: Choose a high-quality paint that is appropriate for the surface you are painting (walls, trim, or ceilings).
- Brushes and Rollers: For smooth walls, a roller will cover more area quickly, while brushes are useful for corners and trim.
- Painter’s Tape: Use painter’s tape to protect trim, windows, and other areas that you don’t want to paint.
- Drop Cloths: Protect your floors and furniture from paint splatters by covering them with drop cloths.
- Sandpaper: Sand the walls lightly to smooth out any imperfections before painting.
- Primer: If you’re covering dark colors or painting over damaged walls, use a primer to ensure the new paint adheres well.
Once you have your materials ready, start by cleaning the walls. Dust, dirt, and grease can prevent the paint from adhering properly, so give your walls a good wash before you begin. After that, patch any holes or cracks with spackle or joint compound, and sand the wall smooth.
Step-by-Step Guide to Apartment Painting
Now that your walls are prepped and your materials are ready, it’s time to start painting. Follow these steps for a professional-looking finish:
Step 1: Tape Off Edges and Trim
Use painter’s tape to mask off areas you don’t want to paint, such as baseboards, windows, and door frames. This will help ensure clean, crisp lines and prevent any accidental splattering.
Step 2: Apply Primer
If needed, apply a coat of primer to the walls. Primer helps the paint adhere better and provides a uniform base, especially if you’re painting over dark colors or patching up walls.
Step 3: Paint the Trim First
Start with the trim (baseboards, door frames, and windowsills). Use a small brush to paint these areas before you tackle the walls. This method prevents you from accidentally getting paint on the trim while you work on the walls.
Step 4: Paint the Walls
Now it’s time to paint the walls. Use a roller to apply the paint in a “W” shape, working in sections. This technique helps spread the paint evenly and avoids streaks. Once you’ve covered the area, use a brush to smooth out the edges and any areas the roller missed.
Step 5: Let the First Coat Dry
Allow the first coat of paint to dry completely before applying a second coat. Depending on the type of paint, this could take a few hours. Make sure the surface is fully dry to the touch before continuing.
Step 6: Apply a Second Coat
For a uniform finish, apply a second coat of paint to the walls. This is especially important if you’re covering a darker color or using a bold shade.
Step 7: Clean Up
Once you’re finished painting, remove the painter’s tape while the paint is still slightly wet. This ensures sharp lines and prevents peeling. Clean your brushes and rollers immediately after use to keep them in good condition for future projects.
Tips for Successful Apartment Painting
To ensure the best results with your apartment painting project, keep these tips in mind:
- Paint in Optimal Conditions: The ideal temperature for painting is between 50 and 85°F (10-29°C). Avoid painting on hot, humid days or when it’s too cold.
- Use Quality Paint: Investing in high-quality paint will ensure that your apartment painting job lasts longer and looks better.
- Be Patient: Don’t rush the painting process. Take your time to apply smooth, even coats of paint.
- Ventilate the Room: Open windows and use fans to help the paint dry faster and prevent inhaling fumes.
- Protect Furniture: Use drop cloths or old sheets to cover furniture and avoid any accidental paint spills.
Conclusion
Apartment painting is an easy and affordable way to revitalize your living space. Whether you’re looking to add a pop of color, freshen up old walls, or create a specific mood, the right paint can transform your apartment. With careful preparation, the right materials, and a little time and patience, you can achieve a professional-looking result that will make your apartment feel like a brand-new home.
Remember, apartment painting is more than just a task; it’s a chance to express yourself and make your living space reflect your unique style. Happy painting!